Old version
This is the CS 111 site as it appeared on May 10, 2018.
Lab 1: Getting started
FLR 267
If your lab meets in FLR 267, you should begin by following the instructions found here.
Task 0: Review lab policies
-
Structure. Lab will typically begin with a brief lecture or example by the teaching fellow, followed by a chance for the class to ask questions. After that, there will be a series of exercises for you to complete.
-
Attendance:
-
For every lab (except for the first lab), there will be an attendance sheet. Make sure you sign the attendance sheet to get credit for attending lab.
-
It is important that you attend the lab for which you are registered on StudentLink. In addition, it is important that your lab comes after your first lecture for the week. In particular, students in the C1 lecture should not be enrolled in a lab that meets before the Tuesday lecture. If you are in an incorrect lab, or if you are not enrolled in any lab, please notify your lecture instructor.
-
-
Participation:
-
To get full credit for participation in lab, you must work productively and submit the work that you complete. You will not be penalized if you cannot finish all of the lab exercises.
-
Don’t hesitate to ask for help! The course staff is more than happy to help you with any questions that you may have, and we will be coming around to assist you during lab.
-
-
Collaboration. You are encouraged to work with your classmates on the exercises in lab.
Note
You cannot get credit for completing the lab tasks at home and coming to lab only to sign the attendance sheet.
Task 1: Introduce Piazza
Piazza is an educational social network designed to facilitate communication between students, teaching assistants, and instructors. If you haven’t set up an account yet, do that now. If you have set up an account, go ahead and log in. In either case, you should use the Piazza link in the navigation bar of the course website.
There are some helpful features of Piazza that we would like to emphasize:
- anonymous posts
- private posts
- customizable notifications
- an app available for Android and iOS
- fast response time
Task 2: Explore IDLE
First, start the IDLE program. If you are using one of the PCs in the teaching lab, you can start IDLE by clicking on the Start menu, clicking All Programs, finding the folder Python 3.5, and clicking IDLE (Python GUI) from that folder.
If you are using your own computer, you should have installed some version of Python 3 as part of Lab 0. If you need help locating the IDLE program on your own computer, ask one of the teaching staff members to help you.
Let’s review the basics of using IDLE. The easiest way to do so is to download a Python file, open it in IDLE, and then run it in IDLE.
-
Right-click on the following link, and then choose Download File As or Save Link As in order to download the file: lab1task2.py
-
Save the file. If you’re using a lab computer, save it to the Z: drive.
-
In IDLE, choose File->Open... (or use Ctrl + o) and locate the file on the Z: drive. Double-click on the file (or click Open) to open it in IDLE. This should open up another window on your screen, which we will refer to as the text editor. This is where we can write programs and save them.
-
From within the text editor, press the F5 key to run the program in the Python Shell (it should execute in the other open IDLE window).
Note
When working on a machine in the lab, you should save all of your work on the Z: drive. This is a special directory maintained by the computer science department which is accessible from any computer to which you are logged on using your CS account (either in the teaching lab or in the undergraduate lab). If you do not save your work to the Z: drive, you will not be able to access your work again after you log out!
To make it easier to manage the browser (the guide to the lab), the text editor (where you are developing a program), and the Python Shell (where Python runs and displays results) on your computer, we recommend resizing and rearranging the windows in the following way:
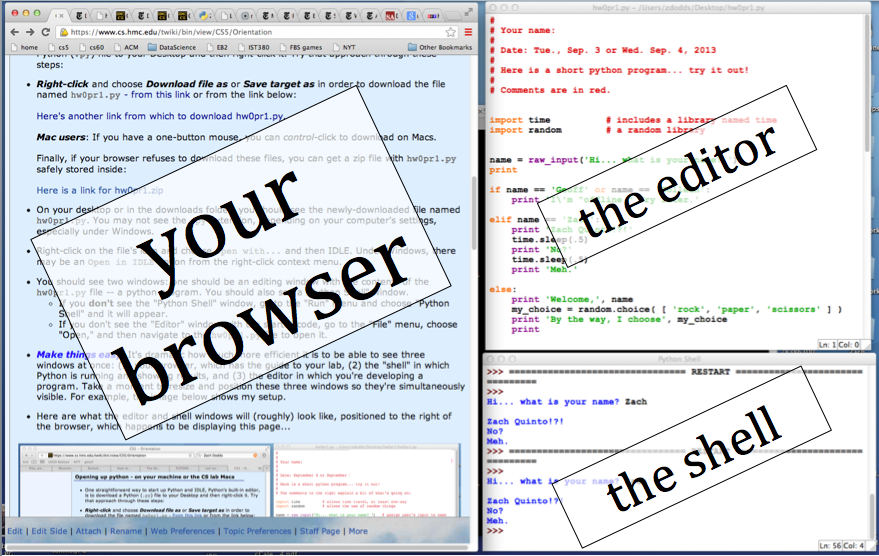
This allows you to make the best use of all three windows simultaneously.
Task 3: Understand and debug Python code
Open up a text editor (Notepad or TextEdit) and create a text file named lab1task3.txt. Put all answers that you write for this task in this file.
Let’s take another look at the program from Task 2.
-
What types of statements are included in this program?
-
In what order are the statements executed?
-
Explain in detail what happens when the following two statements are executed:
course = course + 1
print('maybe you will take CS', course, 'next semester')
-
Consider the following two lines of the program:
weeks = days // 7
print('that is approximately', weeks, 'weeks')
-
What is the difference between
weeksand'weeks'? -
Why does the program print 5 weeks instead of 6 or 5.7142857...?
-
How could we make the program print a more precise result for the number of weeks?
-
-
Copy and paste the following lines into the program, after all of the existing lines:
print() print('Go Terriers!") print('pi is approximately' (22 / 7) -
Save the changes to the program using Ctrl-S. Then try to run it using F5. What happens?
-
The new lines include several bugs. See if you can find and fix them. Feel free to ask the TF or CA if you need help.
Task 4: Practice with Picobot
Open up a text editor (Notepad or TextEdit) and create a text file named lab1task4.txt. Put all answers that you write for this task in this file.
-
Open the Picobot simulator, and replace the default program with the following program:
0 ***x -> S 0
0 ***S -> X 1
1 **x* -> W 1
1 **W* -> X 1
-
Press the button labeled Enter rules for Picobot.
-
Do not press Go! Rather, press the Step button repeatedly. As you do so, watch what happens to Picobot, as well as to the values shown in the State and Surroundings boxes that appear below the control buttons.
As you do so, come up with answers to the following questions, and add them to your
lab1task4.txtfile:-
When does the State change from 0 to 1? Why does this make sense?
-
What happens if you continue pressing Step after the State changes to 1?
-
When does Picobot stop moving completely, even if you keep pressing Step?
-
What does this program do in general? (You may want to try re-running it a few times by pressing Reset and then either Step or Go.)
-
-
Let’s say that we want to modify the previous program so that Picobot will: (1) perform the same initial motions as before, and (2) continue moving until it reaches the upper-left corner of the room.
Your classmate suggests adding the following rule after the existing ones:
1 x*W* -> N 1
However, the resulting program is not valid for two reasons:
- There is a repeat rule.
- Picobot will not actually make it to the upper-left corner.
Add this new rule after the existing ones and click Enter rules for Picobot. Read the error in the Messages pane. Why is this error occurring – in other words, what is a repeat rule? Add your answer to your
lab1task4.txtfile.Fix the program so that it is valid (so that there are no repeat rules) and has the desired behavior. Copy the final program into your
lab1task4.txtfile. -
Write a Picobot program that makes Picobot trace a border around the edge of the map (it should look like a gray border inside of the blue border, perhaps with some additional gray lines). Once you get it working, copy the program into your
lab1task4.txtfile.
Task 5: Submit your work
You should use Apollo to submit the following files:
- your modified
lab1task2.pyfile containing the lines added in Task 3 and the changes that you made when debugging them - your
lab1task3.txtfile containing your responses to Task 3 - your
lab1task4.txtfile containing your responses to Task 4
Make sure to use these exact file names, or Apollo will not accept your files. If Apollo reports that a file does not have the correct name, you should rename the file using the name listed in the assignment or on the Apollo upload page.
Don’t worry if you didn’t finish all of the tasks. You should just submit whatever work you were able to complete during lab.
Here are the steps:
- Login to Apollo, using the link in the left-hand navigation bar. You will need to use your Kerberos user name and password.
- Check to see that your BU username is at the top of the Apollo page. If it isn’t, click the Log out button and login again.
- Find the appropriate lab section on the main page and click Upload files.
- For each file that you want to submit, find the matching upload section for the file. Make sure that you use the right section for each file. You may upload any number of files at a time.
- Click the Upload button at the bottom of the page.
- Review the upload results. If Apollo reports any issues, return to the upload page by clicking the link at the top of the results page, and try the upload again, per Apollo’s advice.
- Once all of your files have been successfully uploaded, return to the upload page by clicking the link at the top of the results page. The upload page will show you when you uploaded each file, and it will give you a way to view or download the uploaded file. Click on the link for each file so that you can ensure that you submitted the correct file.